Using Cloudflare Workers and GitHub Actions to deploy statically generated sites
Deploying performant websites at massive scale has never been easier (or cheaper)
All hail the JAMStack
Sites built on the JAMStack are all the rage these days; they’ve become a popular alternative to full-stack frameworks and server-side rendered web applications. They’re lightweight, performant, and are extremely easy to deploy on platforms like Vercel or Netlify. With that in mind, let’s take a look at how we can step up our deployment game and reduce load times to a minimum.
Netlify is great... but?
Enter Cloudflare Workers. Workers are a serverless platform that allow you to deploy code in various languages like JavaScript, Rust, Python, Kotlin etc. A huge advantage that they possess over other serverless platforms such as AWS Lambda is that workers automatically deploy your code across the globe, thanks to Cloudflare’s massive CDN.
Serverless code is great, but what about content?
Workers also recently released a KV store, that can be used to store static content such as CSS or JS chunks. This makes workers ideal for deploying a performant site at massive scale.
That's great! How do we use it?
Whoa there, hold yer horses. Let’s understand what a worker does exactly before jumping into it.
A worker is a piece of code that’s executed when a particular route on a website proxied by Cloudflare is accessed, before the request reaches Cloudflare’s cache.
The following is a super simple worker, which just responds with a Hello World!.
addEventListener("fetch", (event) => {
  event.respondWith(new Response("Hello World!"));
});
Wrangling your workers with wrangler
Cloudflare has a great tool to configure workers called wrangler. Install it globally using:
# With NPM
npm i -g @cloudflare/wrangler
# With yarn
yarn global add @cloudflare/wrangler
Or just add it to your devDependencies.
Now we need to authorize wrangler to create and edit workers. Run wrangler login to automatically add an API key to your local wrangler config file.
Configuring a domain
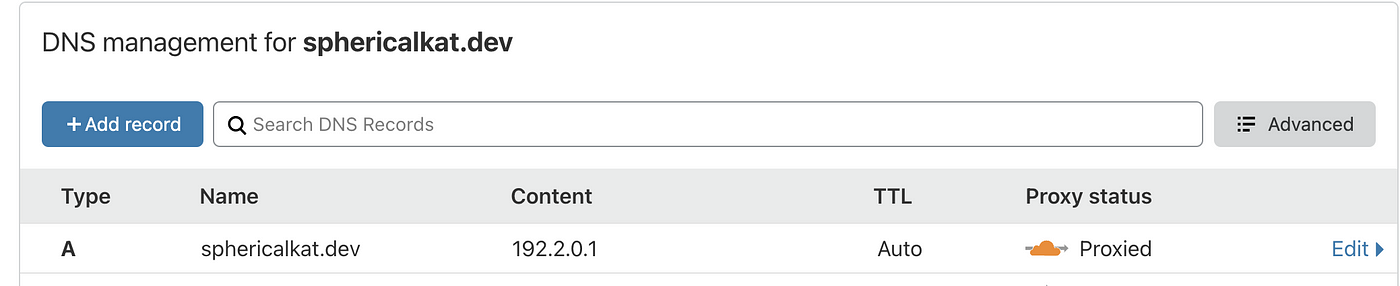
Every site needs a domain, and ours is no different. First, you need your domain added to the Cloudflare dashboard. I already have sphericalkat.dev added to mine.
In the DNS section, add a record of type A, with whatever subdomain you wish that points to any unreachable IP address like 192.2.0.1. This isn’t strictly necessary, but it’s recommended since our worker will intercept all requests and the IP will never resolve.
Creating a statically generated site
Any static site generator should work for this step. I’m personally using Next.js, but you can use whichever one you like.
Add @cloudflare/wrangler to your devDependencies and set up a wrangler project locally. This will be useful for deploying the site from GitHub actions.
❯ yarn add -D @cloudflare/wrangler
❯ wrangler init --site site-worker
⬇️ Installing cargo-generate...
🔧   Creating project called `workers-site`...
✨   Done! New project created /Users/sphericalkat/WebstormProjects/sphericalkat.dev/workers-site
✨  Succesfully scaffolded workers site
✨  Succesfully created a `wrangler.toml`
We’ve got a bunch of new files. Let’s take a look:
- A
workers-sitedirectory: Contains our worker inside anindex.jsfile, with the necessary dependencies. - A
wrangler.tomlfile: A configuration file for deploying the worker.
import {
  getAssetFromKV,
  mapRequestToAsset,
} from "@cloudflare/kv-asset-handler";

/**
 * The DEBUG flag will do two things that help during development:
 * 1. we will skip caching on the edge, which makes it easier to
 *    debug.
 * 2. we will return an error message on exception in your Response rather
 *    than the default 404.html page.
 */
const DEBUG = false;

addEventListener("fetch", (event) => {
  try {
    event.respondWith(handleEvent(event));
  } catch (e) {
    if (DEBUG) {
      return event.respondWith(
        new Response(e.message || e.toString(), {
          status: 500,
        })
      );
    }
    event.respondWith(new Response("Internal Error", { status: 500 }));
  }
});

async function handleEvent(event) {
  const url = new URL(event.request.url);
  let options = {};

  /**
   * You can add custom logic to how we fetch your assets
   * by configuring the function `mapRequestToAsset`
   */
  // options.mapRequestToAsset = handlePrefix(/^\/docs/)

  try {
    if (DEBUG) {
      // customize caching
      options.cacheControl = {
        bypassCache: true,
      };
    }
    return await getAssetFromKV(event, options);
  } catch (e) {
    // if an error is thrown try to serve the asset at 404.html
    if (!DEBUG) {
      try {
        let notFoundResponse = await getAssetFromKV(event, {
          mapRequestToAsset: (req) =>
            new Request(`${new URL(req.url).origin}/404.html`, req),
        });

        return new Response(notFoundResponse.body, {
          ...notFoundResponse,
          status: 404,
        });
      } catch (e) {}
    }

    return new Response(e.message || e.toString(), { status: 500 });
  }
}

/**
 * Here's one example of how to modify a request to
 * remove a specific prefix, in this case `/docs` from
 * the url. This can be useful if you are deploying to a
 * route on a zone, or if you only want your static content
 * to exist at a specific path.
 */
function handlePrefix(prefix) {
  return (request) => {
    // compute the default (e.g. / -> index.html)
    let defaultAssetKey = mapRequestToAsset(request);
    let url = new URL(defaultAssetKey.url);

    // strip the prefix from the path for lookup
    url.pathname = url.pathname.replace(prefix, "/");

    // inherit all other props from the default request
    return new Request(url.toString(), defaultAssetKey);
  };
}
The above are the contents of the index.js worker. We don’t need to modify this.
However, wrangler.toml needs some updates, which are highlighted below.
name = "site-worker"
type = "webpack"
account_id = "" # change this
workers_dev = true # change this
[site]
bucket = "./out" # change this
entry-point = "workers-site"
We can now run wrangler publish to deploy our site to a staging environment.
❯ wrangler publish
✨  Built successfully, built project size is 13 KiB.
🌀  Created namespace for Workers Site "__site-worker-workers_sites_assets"
✨  Success
🌀  Uploading site files
✨  Successfully published your script to
 https://site-worker.amolele.workers.dev
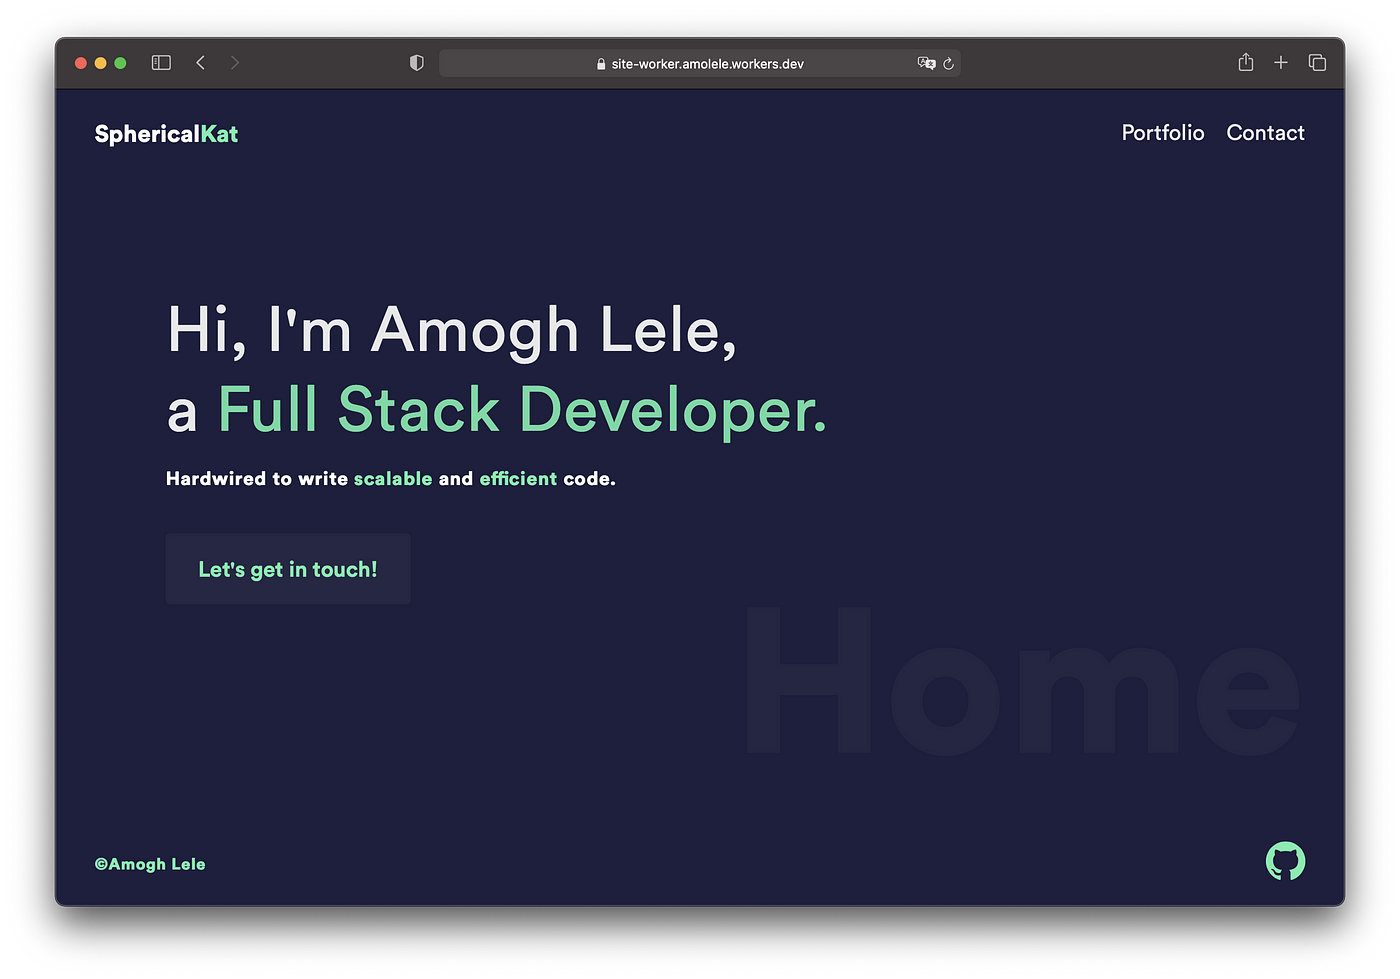
Success! As we can see, the site is now live (and loads super fast) at the URL that wrangler gave us.
Deploying to production
We don’t always want our site hosted at the temporary URL that Cloudflare gave us, and we most definitely don’t want to publish our site manually every time we make some changes. Let’s remedy that.
Enter GitHub actions
GitHub actions allow us to run workflows on any GitHub actions. We’ll be using an action triggered by a push to deploy our site. Let’s create a workflow config file at .github/workflows/workers-deploy.yml.
name: Deploy site to Cloudflare Workers

on: [push]

jobs:
  deploy-main:
    runs-on: ubuntu-latest

    steps:
      - uses: actions/checkout@v2

      - name: Cache yarn dependencies
        uses: c-hive/gha-yarn-cache@v1

      - name: Use Node.js
        uses: actions/setup-node@v1
        with:
          node-version: 12.x
      - run: yarn install --frozen-lockfile
      - run: yarn export

      - name: Publish to Cloudflare Workers Sites
        run: |
          mkdir -p ~/.wrangler/config/
          echo "api_token=\"${CF_API_TOKEN}\"" > ~/.wrangler/config/default.toml
          yarn wrangler publish --env production
        env:
          CF_API_TOKEN: ${{ secrets.CF_API_TOKEN }}
          CF_ZONE_ID: ${{ secrets.CF_ZONE_ID }}
          CF_ACCOUNT_ID: ${{ secrets.CF_ACCOUNT_ID }}
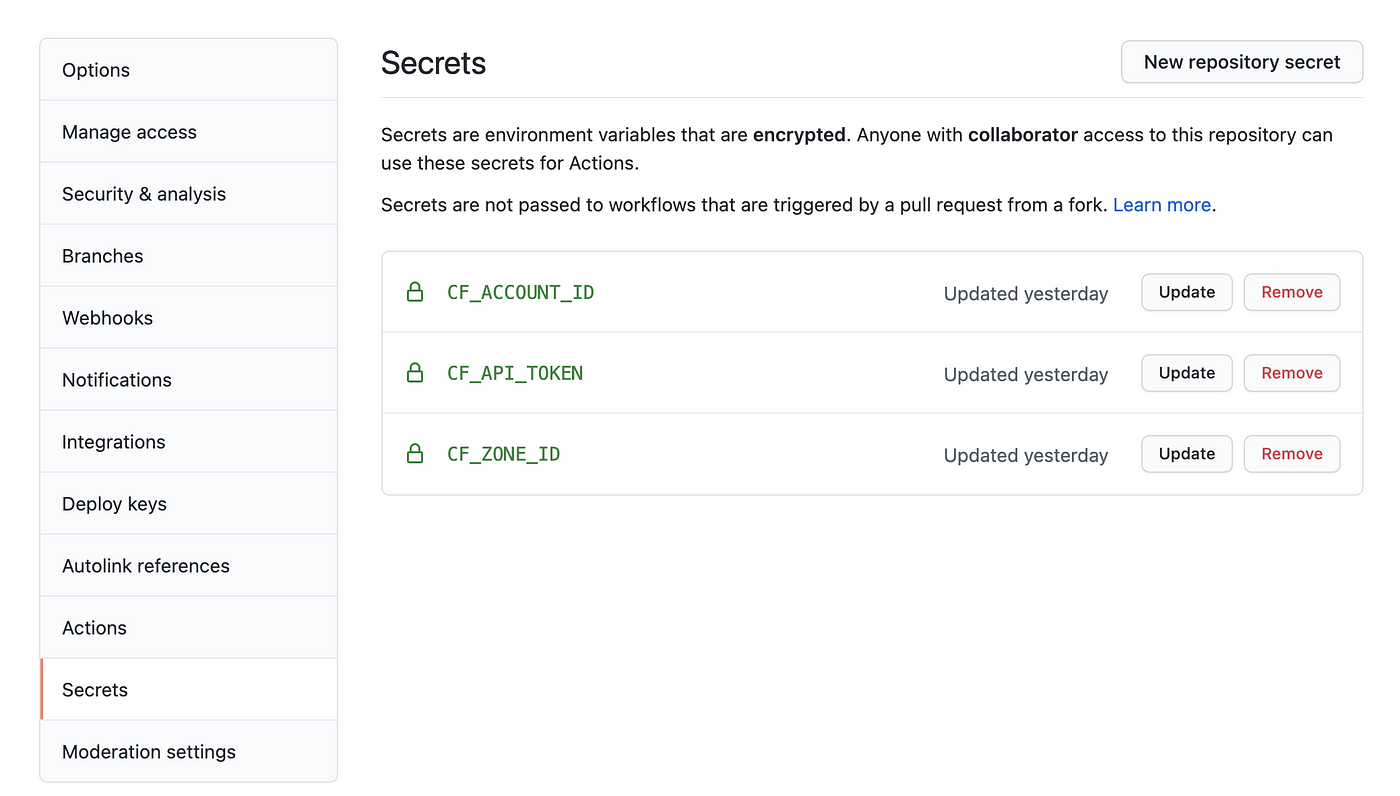
You might have noticed the workflow file using some secrets. These secrets are necessary since we don’t want to expose our API token and account/zone ids to the entire world. Add them from your repo settings like below.
We also need some modifications to the wrangler.toml for production deployments. The modifications are marked below.
type = "webpack"
workers_dev = false
[site]
bucket = "./out"
entry-point = "workers-site"

# add the block below
[env.production]
name = "site-worker-production"
route = "sphericalkat.dev/*"
The production options point a route to our worker. This is necessary for accessing the site using our custom domain.
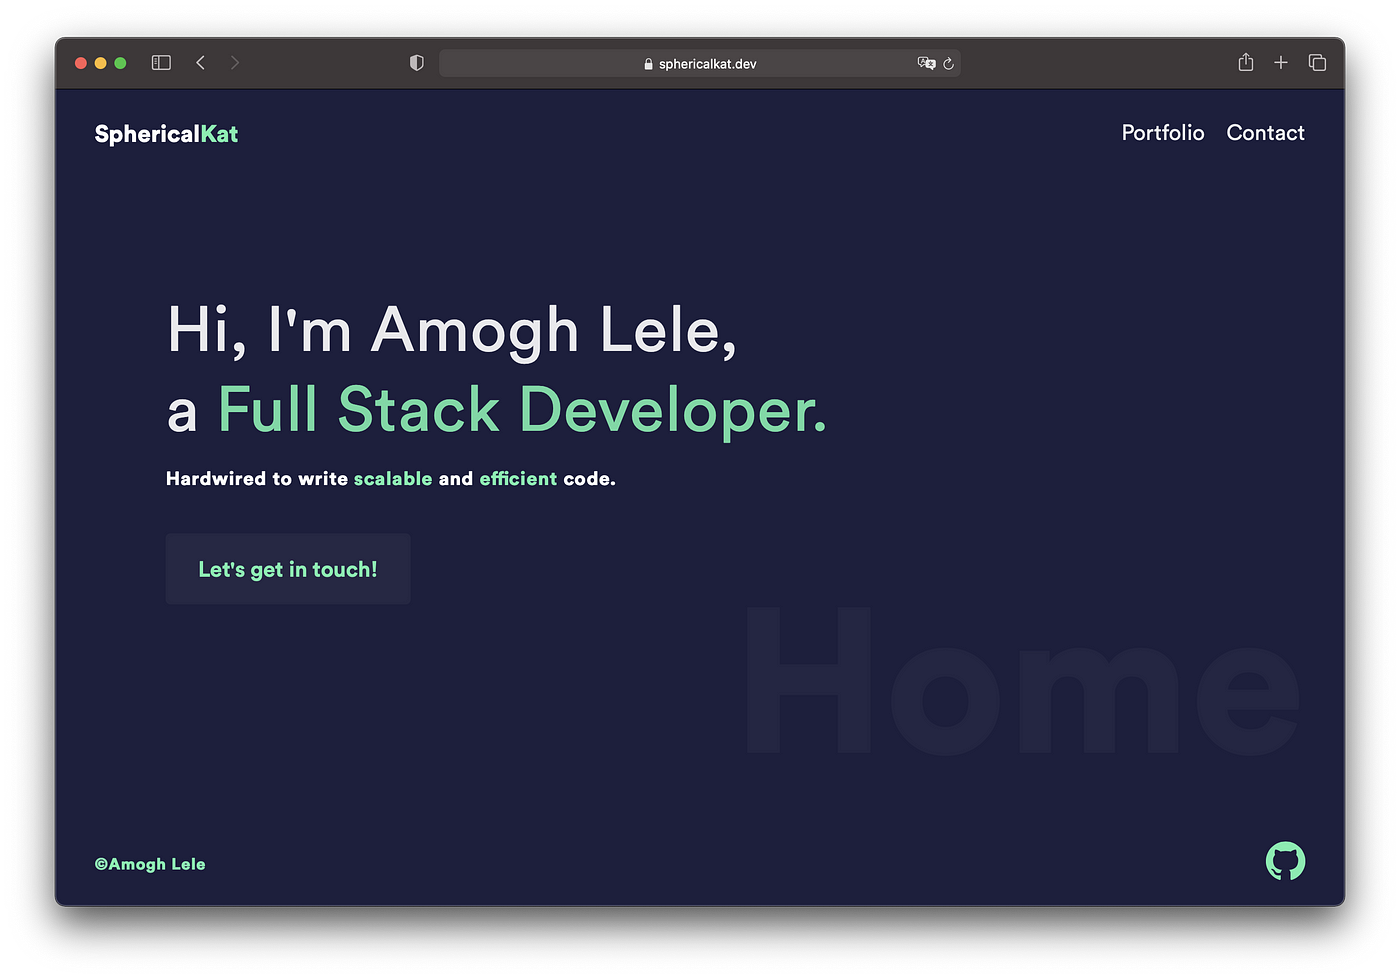
Let’s see if the deploy worked!
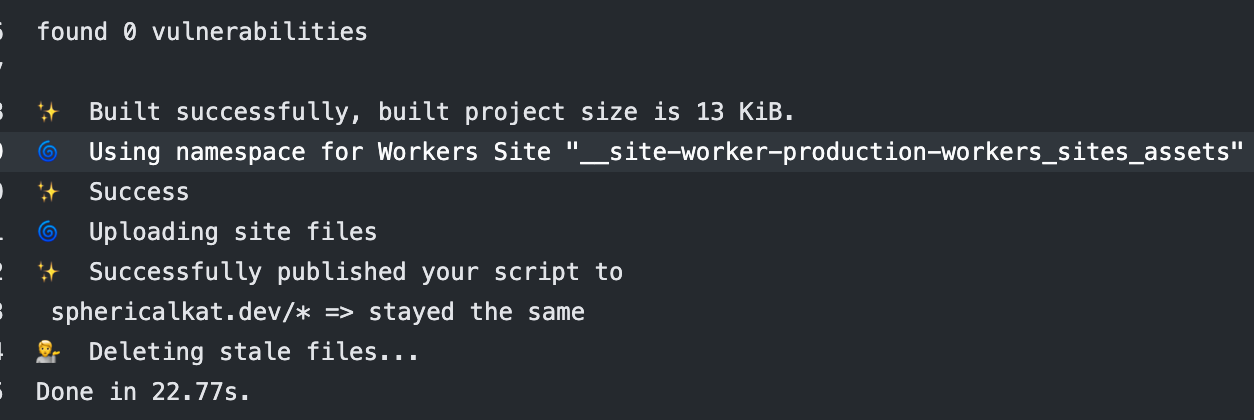
Looks like it did. And sure enough, the site is live.
Conclusions
- Sites require a CDN to be performant. Cloudflare is a known and proven solution.
- Cloudflare Workers and Cloudflare Workers KV allows us to directly deploy statically generated sites to the edge.
- We can use CI/CD pipelines to automate deployments.